
As i was a beginner in android studio (not so long ago) i got into a moment when i was stuck for hours thinking of How to make a button respond to a click event. And so i streamed through the web and again, after several hours i came up with a solution. It was a fantastic thing for me as i managed solving an issue that got me stuck for hours. I admit, it's a small thing to do but anyway i was happy to solve the mystery.
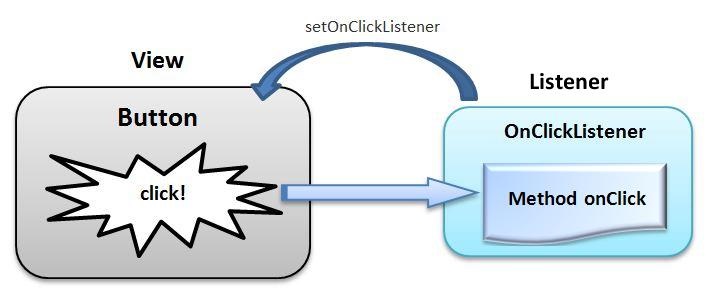
setOnClickListener can simply be put into action by implementing View.OnClickListenr interface on your Activity's class which will then require you to implement it's members. So you definitely will have to implement an onClick method as well. Let's discuss each and every detail we need to know regarding this phenomena.
Implement View.OnClickListener interface
The heading might sound very fancy and like somehow professional, but really in actual practical it's way easier than you read it. The interface i have just mentioned is implemented on your Activity's class.

As the image language says there, just navigate to your Activity's class name beside the AppCompatActivity put a comma then write View.OnClickListener. Some red lines will probably show up which need you to import View. What i normally do to import stuff is hover a cursor over something i want to import and some writings then will show up telling me to import. Click on it, and that's it. Now that we have the interface in one piece, i would say that is one thing, and we got some several stuff to do to make this work. So let's get together and rock this up.
Implement setOnClickListener method
Normally, i don't have to write a setOnClickListener method on my own, because i feel like i would mess things up(you really don't have, too). So what i do after a successive step one is that i hover a cursor over the class name of my activity (which will always be complaining about how your MainActivity say, not being an abstract class therefore it can not implement abstract members) and click on a suggestion that says Implement members. Immediately, somewhere on your activity's code an onClcik() method will automatically show up with argument p0 of type View?. As a simple confirmation, you need to at least have something like the one below.
override fun onClick(p0: View?) {

}
At first, our method is very naked and super simple. It's in here where we will execute some code as a response to click events. But wait, What exactly is this argument p0?, Well, a simple answer to that is, p0 is a view from the screen layout, which will always be passed in each time the onClick method gets to be called. The method is called every time something on the screen is clicked.
Identify which View from the screen is Clicked
An ordinary and also a not weird looking XML layout definitely has got to have more than one clickable view in place. Example, you might have some several edit texts that collect information and maybe buttons for submission of the information that has been collected.Or maybe it could be a login button and a forgot password one. You surely and seriously need to distinguish your reactions to these views depending on which one was clicked. How do we do this ?, let's see right below.
Each View normally contains an Id. It's a special and unique identification we normally provide to each view we add on an XML layout. Provided that no two views can ever have the same id, we can use this utility to do the very thing we want to do (segregation of views). I usually use a when statement to perform the identification. when statement is like an ordinary switch case statement that you probably have encountered in other programming languages such as C++ or java.
 override fun onClick(p0: View?) {
    if(p0 != null){
        when(p0.id){
            R.id.button2 -> {
                Toast.makeText(this, "Button2 Clicked", Toast.LENGTH_SHORT).show()
            }
            R.id.button1 -> {
                Toast.makeText(this, "Button1 Clicked", Toast.LENGTH_SHORT).show()
            }
        }
    }
}
Not every view that is passed in the onClick() method is cool. Some might come in as null and cause us trouble sooner or later. This means we need to have a safety insurance policy to cover us in times of trouble. That's where the condition if(p0 != null) comes in handy. There, we are simply filtering out any uncool views and ignore them as if we do not know if they even exist. This trouble used to be very notorious back then when we used Kotlin extensions. It's for this reason we have View binding these days. If you still do not use View Binding you really have got to. I have an article about it, you check it here if interested.
I have simply implemented a Toast to notify me when a certain button is confirmed as one clicked. It takes-in a context, message and length for which you prefer to show the Toast for. Common options are normally LONG and SHORT though some times i see INDEFINITE as an option too(i have never used it though), and i have no idea why anyone would use such period of time.And Hey, it's not a uniform formula that you implement a Toast as i have. You have some custom lines of code you want to execute, so execute where and when necessary .
I personally think, the process was way easy than you maybe have though it was before. That above, is something we have done. BUT, the OnClickListener interface is not yet registered in our activity. And so we need to do that for our whole thing to work. What am actually trying to point out is, we have not yet registered the interface we just implemented a while ago, and therefore we are not done. We have to do it and below is how to.
 kiunganishi.button2.setOnClickListener(this)
 kiunganishi.button1.setOnClickListener(this)
Include similar lines of code in your OnCreate method (anywhere safe in there). Now, it's totally normal in case you are wondering what the heck is kiunganishi?. Simple and short answer to that is below
package com.softonia.listenerstut

import androidx.appcompat.app.AppCompatActivity
import android.os.Bundle
import android.view.View
import android.widget.Toast
import com.softonia.listenerstut.databinding.ActivityMainBinding

class MainActivity : AppCompatActivity(),  View.OnClickListener{
    private lateinit var kiunganishi: ActivityMainBinding
    override fun onCreate(savedInstanceState: Bundle?) {
        super.onCreate(savedInstanceState)
        kiunganishi = ActivityMainBinding.inflate(layoutInflater)
        setContentView(kiunganishi.root)
        kiunganishi.button1.setOnClickListener{
            Toast.makeText(this, "Button1 Clicked", Toast.LENGTH_SHORT).show()
        }
        kiunganishi.button2.setOnClickListener(this)
        kiunganishi.button1.setOnClickListener(this)
    }

    override fun onClick(p0: View?) {
        if(p0 != null){
            when(p0.id){
                R.id.button2 -> {
                    Toast.makeText(this, "Button2 Clicked", Toast.LENGTH_SHORT).show()
                }
                R.id.button1 -> {
                    Toast.makeText(this, "Button1 Clicked", Toast.LENGTH_SHORT).show()
                }
            }
        }
    }
}
I have decided to drop the whole thing in there so you can see what exactly kiunganishi is. It's a variable with binding properties which i use to access Views from the XML layout. View Binding is super handy and once more i highly insist you start using it.
That marks the end of my probably cool illustration (or boring. It depends on how you enjoyed it). But, it works. I have a couple more articles regarding android application development, feel free to go around my blogs and read any one that grabs your attention. And maybe you got something you would like me to write about, Leave me a Comment.
CIAO


0 Comments